Inputs and Outputs with a Multimeter
This week we were down in the engine room as we were working with on car sensors. The engines we worked on did not have its original ECU (but had after marker ones) and therefore the oxygen sensor and the idle air duty cycle could not be measured. We were given a chart with the sensors on one side and two columns to record the results in different engine conditions. These engines did have a plate where all the sensor signal outputs were. This made it easy for us to record the results.
The first sensor I tested was the TPS (throttle position sensor). This was the potentiometer type meter. This sensor was tested with the key ON and engine OFF position. At closed throttle the sensor measured a reading off 0.574V. This low voltage indicates to the ECU that the throttle is closed. At W.O.T (wide open throttle) the voltage reading was 3.91V. This high voltage would indicate to the ECU that the throttle is now wide open. This test also showed me then voltage scale that this sensor operates in. It operates between 0.5 to 4V. This test was done with the multimeter set into DC (direct current) volts.
The second sensor I tested was the Coolant Temperature Sensor. This sensor was also measured in DC volts. We had two readings for this sensor, Cold engine and Warmed-up engine. For cold engine the sensor gave out a voltage of 2.3V, and for warmed-up engine the sensor gave out a voltage of 0.9V. What this tells me is that the higher voltage indicates cold coolant. The ECU measures the coolant temperature to get a rough idea of how hot the engine is. So when it receives 2.3V it knows that the engine is cold and therefore will supply the engine with more fuel. Its the same when it receives a voltage of 0.9V. This will indicate to the ECU that the engine is now running at its operate temperature. Therefore no extra fuel is supplied.
The third sensor I tested was IAT (intake air temperature) sensor. I was meant to test this when the engine was cold and then hot but I didn't realize it until it was too late and the engine was warmed up. So to overcome this i placed my finger on the hot wire to increase its heat. In another was to fool it and make it read warmer air. When the air was cooler the sensor measured 3.5V. But when I placed my finger on the sensor the voltage slowly crept down to 3.3V. This showed me that the warmer the air the lower the voltage put out by the sensor. Cooler air is more dense than warmer air, and therefore it requires more fuel to burn. When the ECU sees the higher voltage it knows that cooler air is coming into the engine and therefore the engine requires more fuel to ignite efficiently. Its the opposite when the ECU gets a lower voltage, it supplies the engine with less fuel as warmer air is coming into the engine.
The forth sensor I tested was the MAP (manifold absolute pressure) sensor. This sensor was also measured in DC volts. At idle the sensor measured at 0.5V. This indicated low air pressure and high vacuum inside the intake manifold. The high vacuum was the result of the throttle valve being almost 100% closed as the car was on idle. Since the engine is still running the cylinders are still sucking in air on every intake stroke. But since we are only having a small amount of air coming into the intake manifold we create low air pressure and high vacuum. The low voltage will indicate this to the ECU and as a result of this the fuel being injected into the cylinders will decrease. I then turned off the engine to record the MAP sensor reading when the intake manifold pressure is the highest. This reading was taken in the ken ON engine OFF position. The reading was 1.83V. This voltage indicates maximum air pressure inside the manifold. Since the engine is off, the cylinders don't draw in any air. As a result of this the air pressure in side the manifold increases. But when the car is running and the MAP sensor puts out a high voltage indicating high air pressure. The ECU will increase the amount of fuel being injected into the engine.
The forth sensor I tested was the Crank/RPM sensor. This sensor was measured in two readings; Hertz (Hz) and AC (alternating current) voltage. The crank sensor measures the engine speed or a engine's RPM (revolutions per minute). I took two readings both under different engine conditions. One reading was measured at Idle rpm and the other was measured at 2500 rpm. The reading at idle rpm was 550Hz and 3.39V. The reading at 2500 rpm was 1300Hz and 6.00V. This increase in the readings shows us the increase in engine speed. The faster the engine speed the higher the readings we get. The ECU uses this information to know when to advance and retard the ignition timings. The ECU also uses this sensor to keep a track of the engine position. The engine position is used by the ECU to determine when to turn on the fuel injectors.
The fifth sensor I tested was the CAM sensor. This sensor just like the crank sensor was measured in two readings; Hertz (Hz) and AC (alternating current) voltage. The same engine condition were also used to take down the two readings. At idle rpm the reading was 23Hz and 0.9V. At 2500 rpm the reading was 60Hz and 2.05V. This increase in readings shows us an increase in engine speed. The ECU uses this sensor to tell engine position and speed. Without this sensor the ECU wont know when to spark or supple the engine with fuel. This can cause the engine to not start at all. Even if the engine does start it will run rough and will eventually stall.
The last thing I tested was the fuel injector duty cycle %. For this the multimeter was set to Duty Cycle %. All four of the fuel injectors were tested. The test was done under two different engine conditions; at idle and at acceleration. At idle the fuel injector duty cycle was 1.7%. This meant the fuel injector only injects fuel 1.7% of the time. Because the engine is at idle not a lot of fuel is required as we are not drawing a lot of air. But when we accelerated the engine the fuel injector duty cycle % increased from 1.7% to 6.5%. Since the engine was accelerating it was pulling in more air into the cylinders. More air requires more fuel to burn efficiently. Therefore the duty cycle % increased. Now the fuel injectors are held open for longer, as a result more fuel is injected into the cylinders.

Petrol Fuel Injector Testing
This worksheet was about testing injectors on an engine to see if they are still serviceable. The first thing we had to do was to listen to each individual injector and see if they are actually working. When an injector is corking they make a sharp taping noise. This noise is very silent and cannot be heard. To listen to this noise I took a long screw driver, put it against the injector and had a listen. All the four injectors were making a taping noise; hence indicating that they are all working. The next test I had to do was to check to see if the injectors are getting enough voltage. For this test I set the multimeter on DC (direct current) voltage. The fuel injectors should be receiving battery voltage. So I recorded the battery voltage which was 14.06V. I then recorded the voltage reading of each fuel injector. All the fuel injectors had a voltage of 14.05V. This is a good result as the injectors are receiving almost full battery voltage. This means that all the circuitry for the injectors are in good condition, and are not causing any resistance. The 0.01V drop from the battery to the injector was due to the resistance of all the wires from the battery to the injectors, which is normal. This test was done with the engine in key On and engine OFF position.
(NOTE: This worksheet was performed on a different engine therefore the Duty Cycle % are different)
My next task was to record the fuel injector duty cycle % and Hertz (Hz) at idle. This was to be done for each individual injector. So i turned on the engine and let it warm up. My reason for this is that when the engine is cold it gets supplied with more fuel. This means that the fuel injector duty cycle % and Hertz readings will be higher then normal. So I let the engine warm up and then took my readings. At idle the fuel injector duty cycle % was: Injector One: 3.9%, Injector Two: 3.9%, Injector Three: 3.9%, Injector Four: 3.9%. The Hertz reading at idle was: Injector One: 20Hz, Injector Two: 24Hz, Injector Three: 20Hz, Injector Four: 22Hz. These were good results because it shows us that at idle the fuel injection is low as too much fuel is not required.
My next task was to record the fuel injector duty cycle % and Hertz (Hz) while I give the engine a short burst of acceleration (quick throttle openings). Since the engines didn't have a rev meter I wasn't too sure how much I was revving. But I tried to be consistent with my quick accelerations. My duty cycle % were Injector One: 12.5%, Injector Two: 12.6%, Injector Three: 9.3%, Injector Four: 10.1%. My Hertz readings were: Injector One: 108Hz, Injector Two: 119Hz, Injector Three:119Hz, Injector Four: 125Hz. My results do vary but that is not because the injectors were bad, it is because of human error. I was giving it the boot and it wasn't always the same. As a result of this my readings vary. These are still good results as it shows us that the fuel injectors do supply more fuel when the engine is under load.
These readings were then used to calculate the pulse width of each injector both at idle and when the engine is revved up. The pulse width is calculated in ms (Millie Seconds). The pulse width of a fuel injector is the amount of time a fuel injector is open during a cylinder's intake stroke. The formula for this is:
"Pulse width (ms) = (Duty Cycle % X 100)/Frequency (Hertz)"
My calculations are shown in the picture below but here are two examples of my calculations for injector number one at both idle and acceleration.
Idle: (3.9% X 100)/20 = 19.5ms
Acceleration: (12.5% X 100)/108 = 11.57ms
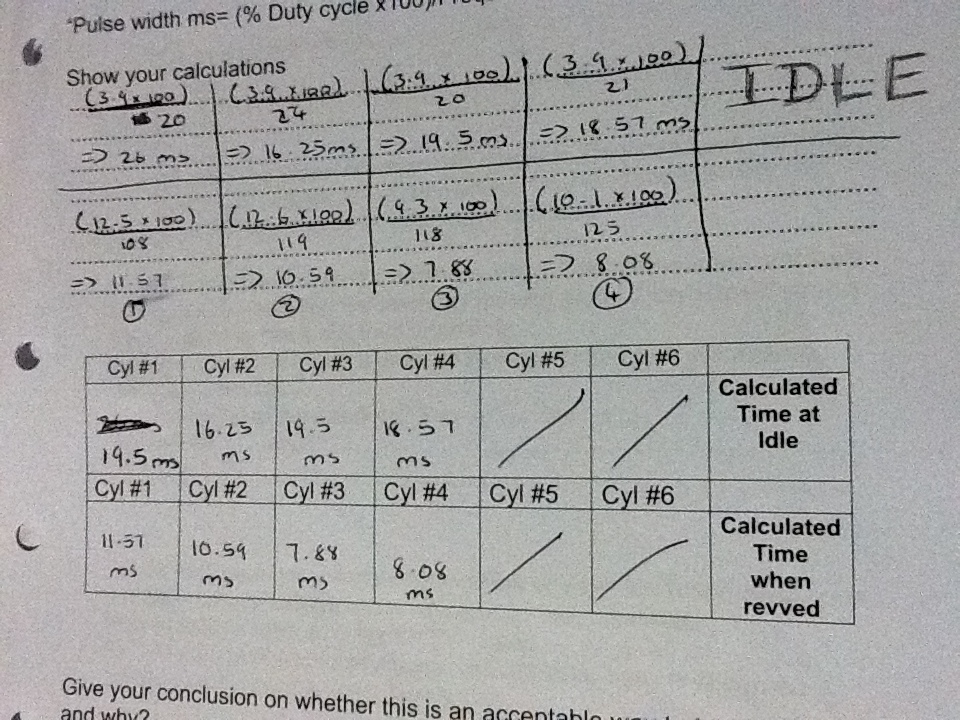
These are good results but as you can see the pulse with of the injector is lower when the engine is revved. Why is that? well it is simple when the engine is being revved the engine speed increases. Which means that each revolution now takes less time. As a result the injector open time is also reduced. But in saying that a pulse width of 11.57ms under acceleration is good and the injector is actually open for longer supping the engine with more fuel. In conclusion the injectors on this car are in good working condition. They also respond to engine conditions immediately which is another sign of good injectors.
Input Sensors and Actuators On-Vehicle
This was a similar worksheet to the one I had done before (inputs and outputs) but in this worksheet we go more in depth with our voltage readings. The first thing I had to do was to measure the voltage at each of the four injectors. For this test i set my multimeter to DC (direct current) volts. I first recorded the battery voltage which was 14.02V. The voltage measured at the fuel injectors was 14.01V. This is a good reading as all of the battery voltage is being available to the fuel injectors. Voltage plays a part in the fuel injection duration time. If the voltage was low the fuel being supplied for the engine will be low and as a result of this the engine will run lean and experience lack of power. This lack of voltage at the injector can be caused by faulty wiring (wires causing resistance to current flow), worn contact points (arching or corrosion on the points can cause resistance to current flow) and it can even be caused by bad terminal contact points at the battery (corrosion could build up between the terminal and the wire causing high resistance). This test was done in the key ON engine OFF position.
TPS
Now I had to test the voltages at the TPS (throttle position sensor). The first reading we had to do was to check the reference voltage at the TPS. My multimeter was still set to DC volts and the engine was still in the key ON engine OFF position. The reference voltage I got was 4.99V. This is a good result as we know that a potentiometer type TPS works on a scale of 0 to 5V. The reference voltage is the voltage going to the TPS. This voltage is then used up by the resistor and we get our various voltage readings. If this voltage was restricted by faulty wiring or connections, the ECU would not be able to tell the correct throttle valve angle.
Example: Say the TPS is only receiving a reference voltage of about 3.5V instead of 5V. This will mean that when the throttle is wide open the ECU will only get a voltage reading of 3.5V. Which will actually tell the ECU that the throttle is only opened just above half way as W.O.T requires a voltage reading of 5V. This will then result in the ECU supplying the engine with insufficient fuel. As a result the engine would run lean. We then checked the ground at the TPS. The result was 0.02V. This is a good result as it shows us that there is no restrictions to current flow on the ground side of the TPS. Restriction at the ground can also cause the car to run lean as voltage not is being used up to carry the current through the ground. Which means less voltage is available to the TPS.
My next test was to check the signal voltage coming from the TPS. This was again done in the key ON engine OFF position using DC volts. When the throttle is closed I got a signal reading of 0.5V. This is good because this low voltage indicates to the ECU that the throttle is closed. I then open the throttle about half way and got a reading of 2.3V. This was also a good result as the increase in voltage tells the ECU an increase in the throttle valve angle (more air is now going to come in). Lastly i measured the signal voltage at W.O.T, it was 4.2V. This is also a good result as it indicates to the ECU that the throttle is now wide open and that now the engine will need more fuel. Doing these reading and watching the readings on the meter rising and falling as I opened and closed the throttle indicated to me that the TPS is working fine. There were no sudden jumps or drops in the voltage being put out by the TPS. Jumps or drops in the voltage could mean resistance within the TPS.
A TPS sensor is an important sensor in a car as it tells the ECU how wide open or shut the throttle is. The TPS is mounted on the throttle body (in series with the throttle body valve). It converts the throttle valve angle into an electrical signal. This electrical signal is then sent to the ECU, indicating the throttle position. The signal sent to the ECU is in DC (direct current) volts. The ECU then uses this information to alter the air/fuel mixture. The more the throttle is opened, the more air is coming into the engine. To burn up all this air efficiently more fuel is required. This is why the ECU needs to know the throttle valve angle so that it can compensate for the air that is coming into the engine. The TPS sensor works on a 0 to 5 volt scale. When the throttle valve angel is low, say around 10 degrees. The voltage sent to the ECU is also low, say around 1.5 volts. The ECU will then look at this voltage and know that throttle is barely open and therefore it can then adjust the air/fuel mixture. The same applies when the throttle valve angle is very high, say around 75 degrees. The voltage now being sent to the ECU will also increase, say to around 4 volts. The ECU will look at this voltage and know that the throttle is now wide open and hence it will adjust its air/fuel mixture by adding more fuel.
Now how does the TPS convert the throttle valve angle into a voltage reading? Well this is very simple. Inside the TPS there are two major components; a resistor and a wiper arm. Imagine a simple series circuit with a 5 volt power supply and a resister. This is pretty much the what the TPS is. The wiper arm is in contact with this resistor at all times. Now this wiper arm is mechanically connected with the throttle valve, and as the valve moves so does the wiper arm. As the wiper arm moves on the resistor, the signal voltage output changes. At the point of contact the signal voltage that we are getting is actually the available voltage. This voltage then indicates the position of the throttle valve.

ECT (Engine Coolant Temperature) Sensor
My next sensor I tested was the engine coolant temperature sensor. The testing for this sensor was done with the multimeter set on DC (direct current) volts and with the engine running. I recorded the voltage from the sensor when the engine was cold. The reading I got was 2.9V. This is a good reading as it indicates to the ECU that the engine coolant is cold. The ECU then uses this information to get an estimate of the actual engine temperature. When the ECU sees this voltage it knows that the engine is cold and therefore supplies the engine with more fuel. The reason why it does that is because fuel needs to be in vapor form to ignite in the combustion chamber. But when the engine is cold the fuel starts to condense back into liquid form. Therefore more fuel is supplied to the engine. When the engine was warm the sensor measured at 2.0V indicating that the engine is now warm and that no extra fuel is required.

The coolant temperature sensor is basically just a thermistor. As the temperature that its measuring heats up the voltage put out by the thermistor decreases. Think of the thermistor as a voltage divider circuit, with a fixed value resistor and a variable resistor (which is the sensor). The voltage signal out is placed between the two resistors (therefore measuring available voltage). Now the voltage drop over the fixed resistor will be determined by the resistance of the variable resistor (sensor). When the temperature is cold so is the variable resistor (sensor). When the sensor is cold its resistance is very high. Now since the variable resistor has a much higher resistance then the fixed resistor, the voltage drop over the fixed resistor will be minimal. Therefore the voltage signal (available voltage) will be high. This high voltage indicates to the ECU that the thermistor is sensing cold temperatures. Now as the temperature stars to heat up, so does the temperature on the variable resistor (sensor). This increase in temperature will cause the resistance of the variable resistor to drop, causing a higher voltage drop over the fixed resistor. This higher voltage drop over the fixed resistor will cause the available voltage (voltage signal) reading to also drop. This drop in the voltage will then indicate to the ECU that the thermistor is sensing warmer temperatures.

I then tested the ground at the coolant temperature sensor. The reading i got was 0.02V. This is a good reading as it is showing us that there is no extra resistance at the ground side of the circuit. Any resistance here could cause the voltage at the sensor to drop. This would affect how the car operated when it was cold. Say the ground at the sensor was measured at 1V. That means now when the engine is cold the sensor would actually read 2V. This 2V would indicate to the ECU that the engine is warm but in fact it is cold. This will cause hesitation when the engine is trying to start up cold. It would also cause the engine to idle rough when its cold.
MAP (Manifold Absolute Pressure) Sensor
My next sensor I tested was the MAP (manifold absolute pressure) sensor. All the readings for this sensor were taken with the multimeter set on DC (direct current) volts. The readings I took were the same readings I took for the inputs and outputs worksheet (mentioned above in the blog). When the engine is at key ON engine OFF position you get the maximum air pressure inside the intake manifold as there is no air being drawn in by the cylinders. The reading I got was 1.83V. I then turned on the engine and let it idle. At idle we have low air pressure and high vacuum. This is because the throttle valve is shut and only minimal air is allowed to come into the intake manifold. Since the engine is running the cylinders keep drawing in air, but with a lack of air supply vacuum inside the intake manifold is created. The reading I got was 0.45V. This is a good reading as the drop in voltage tells the ECU the drop of air pressure inside the intake manifold. The ECU then looks at this and alters the fuel injection levels. When you give an engine quick bursts of acceleration you create a depression inside the intake manifold as the cylinders draw in more air. This depression then causes more air to be drawn into the manifold. This increase of air causes increase of air pressure. The reading I got was 1.2V. This is a good reading as the increase in voltage tells the ECU that there is an increase in air pressure inside the intake manifold. The ECU will then use this information to alter the fuel injection levels. Basically an increase in air pressure results in more air being drawn in by the cylinders. Therefore more fuel is required by the engine to burn off all the air particles efficiently.


IAT (Intake Air Temperature) Sensor
The last sensor I was able to test was the intake air temperature sensor. The testing for this sensor was done with the multimeter set on DC (direct current) volts and with the engine in the key ON engine OFF position. We only had to measure the voltage coming out of the sensor. Since the engine had been running before the air around the engine was warm. This meant that warm air was being sucked into the engine This caused the voltage reading from the sensor to be low. It was 2.4V. This is a good result as the lower voltage from the sensor indicates that it is picking up warm air. The IAT sensor is an important sensor because it tells the ECU how hot or how cold the intake air is. As we know colder air is more dense than warmer air this means that more fuel is required. The ECU needs to know this information to alter the air/fuel ratio depending on the air temperature. The IAT sensor is also a thermistor and how it works has been mentioned before in this blog under the ECT sensor.

Very good work, keep it up.
ReplyDeleteI will my brotha I will!!!
ReplyDelete